|
|
|
|
|
|
|
|
|
|
|
|
|
Crazy Projects |
|
Here is
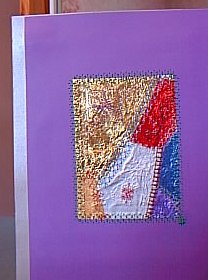
something I have been doing recently |
Sewing
on Foil:
Here is basically how I have done it. You need: Thin card, thin foil, used sewing machine needle, machine embroidery thread (dark threads, or ones with a great contrast to the foil are best...metallic ones don't seem to show up very well.), and also a small piece of card and bits of foil to trial stitches on. |
|
A bit about problems: --I am still trying to work out how to keep from making "tracks" in the foil with my presser foot. My machine doesn't have a presser foot tension adjustment...But it does have the programmed stitches I wanted to use. The tracks do cut down on the shine and the play of light on the piece, especially if you embroider all the seams and the middles as well. If I come up with a good solution, I will let you know. If you try it and have a solution...Let ME know! --If you make a hole (like from a piece of your design that is too dense), cut another piece of foil and make a sort of a patch, only trimmed to lay flat within the line of the stitches you did on the seam. Put stabilizer, or another piece of card or paper behind the hole, and try another motif. If you use the same motif, it might cause problems, as the section of card is already weak from the first holes. If you rub the edges of the new piece of foil, it should mold to the shape of the first piece enough to be unnoticeable. |
IMPORTANT: You must choose open stitches, or you will cause a hole...especially any sort of satin stitch. 2. After covering the card, choose some larger designs from the machine and embroider the patches. These have to be open designs as well. 3. Take the section of your card with the aperture and lay it over your work. Move it around till you find a part you like. Turn both over, and put a bit of tape on the edge of the work to hold it to the card. 4. Turn back over, and sew a decorative stitch along the edge of the aperture. You can overlap, or not as you see fit. 5.Turn back over and trim the
work up to that stitching. Cover the back of your work with the card flap,
or with another piece of card or paper. If there are any sections in the
trimmings that look good, you can trim them to a nice shape and sew them
to the piece that covers the back of the work first. Maybe you can even
cut a piece with fancy scissors to glue to the back of the card.
|